Sunday, December 30, 2012

★ Neon Nonslip Hangers

DIY Neon Nonslip Hangers


What you'll need
- wire hangers
- yarn
- tape
- scissors


STEPS
 
1.figure out how thick you want your hangers to be. To mimic a standard hanger, we used 5 at a time.
2.Tie yarn right under the curve at the top of your hangers. Now wrap! You want to keep things pretty tight, and it's best to keep the yarn in one bundle. If you don't want to deal with the whole yarn skein, grab a phone charger or cork and create a smaller spool as we did for our Cozy Winter Cuffs
3.As you wrap, remove the clear tape. Keep wrapping and wrapping.
4.Repeat with as many hangers as you like and you're done. 

Wednesday, December 19, 2012

♬ Last christmas [ cover ]


It may take a little time please wait a moment. 

★ Neon Pyramid Necklace.

D.I.Y Neon Pyramid Necklace


what you'll need
- 3 Straws
- Gold Spray Paint
- Colorful Paper (tip: look for interesting prints from a magazine)
- Tacky Glue
- Needle & Thread


STEPS

1. Spray paint straws.
2. Cut an inch or two off, depending on how big you'd like your triangles to be.
3. Fold them into a triangular shape and insert one of the ends into the other to close.
4. Attach paper to each triangle with glue.

5. Run needle & thread through the back of the necklace to connect the triangles.
 

★ Custom Painted Initial Canvas.


DIY Gifting Custom Painted Initial Canvas

DIY Gifting: Custom Painted Initial Canvas for Baby 


DIY Gifting: Custom Painted Initial Canvas for Baby What you'll need... 
- Canvas  
- Acrylic paints
- Paint brushes... cups for water & mixing paints
- White colored pencil


  STEPS 

1.If you don't find the exact color you're looking for in one tube, make your own by mixing like colors.  
2. Add a little water and stir until blended well into the color you like
3.Paint your entire canvas, including your edges and let dry. 
4.Acrylic paints are water-based and dry pretty quickly! {rinse off your brushes after use}
5.created polka-dots with a rubber wine cork
6.Space them however you like or begin at the center and work out like a grid.
7.Use a paint brush to touch them up and fill in the gaps

8. Using a white colored pencil, lightly draw out your letter. ***You may also create or use a stencil if you don't trust your free-hand skills
9. Mix your pink and carefully paint your letter
10.Use a fine brush to touch it up... Once dry, you may need another coat so save your paint just in case!

NOTICED : Your paints may dry a bit darker than they look wet

DIY Gifting: Custom Painted Initial Canvas for Baby 


Tuesday, December 18, 2012

♬ A thousand years - Christina Perri

Let listen some music while reading my blog hope you enjoy! ☺

★ pom pom bracelet.


DIY Pom-Pom Bracelet

nearly christmas nearly party let make some unique accessery for your party!


WHAT YOU'LL NEED
- Scissors
- Pliers
- Curb chain (enough to go around your wrist)
- Pom-pom trim (same length as chain)
- Clasp
- Jump rings (10-20)
- Thin cord (I used approximately 62 inches)

STEPS 


 1. Begin by creating a chain sinnet, with loops a similar size to the links of your chain. This chain sinnet tutorial is an excellent step-by-step. Make the cord chain as long as your metal chain.


2.To finish, pull the loose end of the loop through.


3.Next, thread the longer, loose end through the first link of the metal chain, then back into the next loop down of the cord chain.


4.Bring the loose end of the cord back around and up and into the next link of the metal chain. Then, thread it down into the next loop of the chain cord. Repeat with all the links of the metal chain. If you find that you have more loops in the cord than links, it's easy to undo a few until you have an equal number of loops and links.


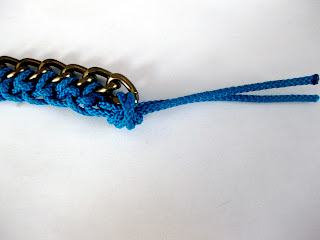
5.Knot both ends of the cord through the last link.


6.Use pliers and jump rings to attach a clasp to both ends of the bracelet.


7.You certainly could stop here with the bracelet-- I really like the cord and chain look. Maybe add another color cord to the other side of the chain for some extra color


8.Line up the pom-pom trim with the bracelet, and trim if necessary. You can keep the ends of the trim from fraying with Fray Check or by fusing with a lighter.


9.Open up the jump rings with pliers, then push one end of a ring through the trim. Close the ring back around the chain. Repeat with other jump rings. I used about 10, connecting the trim to every other link of the chain.


10.Another idea: this could make a really cool necklace if you extended the chain so it was long enough to reach around your neck.

Thursday, December 13, 2012

★ unique shoes.

 D.I.Y SPARKLY ONE-STARS


Do you bored your OLD CONVERSE? If YES let adapt your converse to look new and be unique!


Here's What You'll Need

- Converse
- Fabric glue
- Crayola paint brushes 
- Silver glitter 
- Fine glitter in black
- Painter's tape
- Iron-on silver pyramid studs 


STEPS 

1.Squeeze a large amount of fabric glue into a cup or plate. Tape down the sides of your sneakers with your painter's tape. Using a paintbrush, apply a moderately thick layer of glue to the tongue of your shoe.

2.Place your sneaker in an open box and sprinkle a generous amount of glitter over your glue.  
3.Once your tongue is almost dry, remove the tape from the sides of your shoe and apply a generous layer of glue to your sides. It's best to do one at a time because the glue dries pretty fast.
4.Sprinkle your larger silver glitter and shake to remove excess.
5.Shake your shoe and allow the black fine glitter to settle and discard any unwanted silver glitter. If you missed any spots, now is your chance to add a little more glue and fill them in. 
6.To create a faux steel toe,  used small iron on pyramid stus
7.Paint a generous amount of glue on the rubber toe of your sneaker. You'll have to work quickly because it dries fast
8.Begin adding your studs at the center where the rubber meets the glitter and work out from there to either of the edges. Then create a sort of T by placing studs in a row down to the tip toe of your shoe and work out from there
9.Hoping to get a dark gray, I dyed my shoelaces black with Rit Dye. However, the dye barely took at all and left the laces a very light gray.